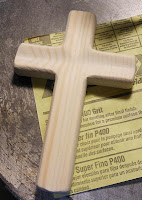
Worry Cross – The Making Of


I thought I would make another Worry Cross and take more pictures and give a bit more information on how I make them.
I start out with a ¾” piece of pine. Pine works well for this as there is a lot of sanding by hand.
The next step, I draw lines as to where I would like to have the groves I am going to make using my
router. I use a ½” Core Box bit. I set it so the groove will be about 1/8” deep. After running a test on scrap wood, I route both sides with a groove going horizontally and vertically. I put these groves in to help lessen the amount of sanding as well as giving me a guide to where I want to sand.
If you can see in the picture I had a spot where the wood shifted on the router. As it was not too bad I can still use it because it was not a major mistake and I will be sanding this down further.
Once the grooves are cut and match up, I glue the pattern onto the wood making sure to center on the groves. Now I go to the scroll saw and using a #5 blade I cut out the piece to the shape. The size is about 6” tall by 4” wide.
Once cut I remove the pattern and go back to the router. The goal here is to round the edges. I used ¼” Roundover. Again I suggest running a scrap piece to make sure you have the router setup how you want. Now I run the piece through on both sides.
Now the sanding - I start out with 80 grit to shape the piece. Then move to a 150 grit to start to smooth the piece then finish it off with 400 grit.
From here I stain the piece and then start putting on Polyurethane. After a couple of coats ,I run a piece of 400 grit lightly over it to keep the piece as smooth as I can.
One piece I used Minwax Cherry #235 and the other Watco Danish Oil Black Walnut.
Here is the final product.
For more, see the post on 4/16/2012.
Thanks again to my sister Tami for the idea.
Pictures below show the various steps:


.jpg)


